As an integral part of any party, balloons seem to have come from the land of eternal celebrations. At the same time, since these inflatable pieces of festive spirit appear at every other event, they may seem to be a bit cheesy. Still, if you believe that a balloon is nothing but a cheap backdrop decoration, you are completely wrong! In this blog, we’ll show you how a pinch of creativity can take even a classic latex balloon to the next level of sophistication. For example, with this miniature replica of a hot-air balloon, you can fill your space with the spirit of adventure and learn how to make a hot air balloon net! Divide the cord into four sections consisting of two strands each. in order to bring this masterpiece to life, you’ll need to stick to easy how-to instructions and let your imagination take a flight.
MaterialsBefore setting the ball rolling, make sure that all the needed materials are in place. Basically, you’ll need the following:
|
|
|---|
Materials
Before setting the ball rolling, make sure that all the needed materials are in place. Basically, you’ll need the following:
- Though the image features a clear balloon, there are no limitations here. You can follow our example, go for our traditional latex balloons, consider balloon figurines, or bedazzle everyone with our freshly arrived reusable vinyl inflatable beauties.
- Fillers for the balloons. If you decided on clear balloons, it’s recommended to fill them with something that matches the rest of your decorations. The list of possible options may include flowers, petals, palm leaves, confetti, string lights, or tiny balloons.
- Balloon sticks (you won’t need these for helium balloons).
- Through it’s up to you to decide, but we strongly recommend you shop from our preserved moss collection. Alternatively, you can also take our square wooden planters into consideration.
- Piece of styrofoam to secure the balloons.
- Ribbons to match your color palette and theme.
- Flowers to fill the basket.
- Hot glue gun or glue dots.
- Pair of scissors.

|
|
Step 1: Prepare the Balloons
|
|---|
Step 1: Prepare the Balloons
- If you have traditional balloons, use our small manual pump to blow them up.
- Tie the balloons to the sticks. For additional security, insert the ends tightly into the provided slots.
- To cover the sticks, use colorful trims from our extensive collection of assorted ribbons. Wrap ribbon around the entire length of the sticks.
- To secure the ribbon, use our hot glue gun.

Step 2: Attach the Balloons to the BasketsThere are lots of ways to keep the balloons in place. In our opinion, the easiest one is to:
Step 3: Attach the RibbonsIn order to make the centerpiece more similar to a real hot-air balloon, use ribbons.
|
|
|---|
Step 2: Attach the Balloons to the Baskets
There are lots of ways to keep the balloons in place. In our opinion, the easiest one is to:
- Cut a piece of styrofoam to fit the basket.
- Put it into the basket and make sure that it isn’t wobbly.
- Stick the balloon into it.
Step 3: Attach the Ribbons
In order to make the centerpiece more similar to a real hot-air balloon, use ribbons.
- Take several thin ribbons and tie them one by one to the balloon stick.
- Extend each ribbon up and over the balloon and secure it with our glue dots (don’t use a hot glue gun!).
- Repeat the process with all the ribbons.

Source image
|
|
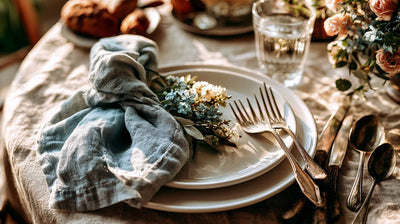
Step 4: Add FlowersOnce everything is ready, finish things off by adding some flowers. Though the picture features roses and chrysanthemums, these are not the only options. Luckily, our online store offers plenty of blossoms to experiment with. You can go for roses, peonies, tulips, baby breath, and beyond! Whichever flowers you go for, do the following:
|
|---|
Step 4: Add Flowers
Once everything is ready, finish things off by adding some flowers. Though the picture features roses and chrysanthemums, these are not the only options. Luckily, our online store offers plenty of blossoms to experiment with. You can go for roses, peonies, tulips, baby breath, and beyond! Whichever flowers you go for, do the following:
- Cut off excess stems for easy attachment.
- Like you did with the balloons, just stick the flowers in the foam. For a cohesive look, mix and match blossoms of different sizes. Our multi-sized peonies are the best option here.
- For a lush look, you can add some greenery.
- Keep adding more and more flowers until the foam is completely buried underneath.

Well, that’s all it takes to assemble an ultimate balloon centerpiece. Despite its impeccable look, it won’t take you longer than half an hour to recreate. It should also be noted that you can either use materials, which are similar to those featured in the picture or let your creativity run wild with completely different balloons, flowers, baskets, and trims. Either way, if you have any questions or suggestions regarding this Hot-Air Balloon Centerpiece, please let us know in the comments below!